Opening Description
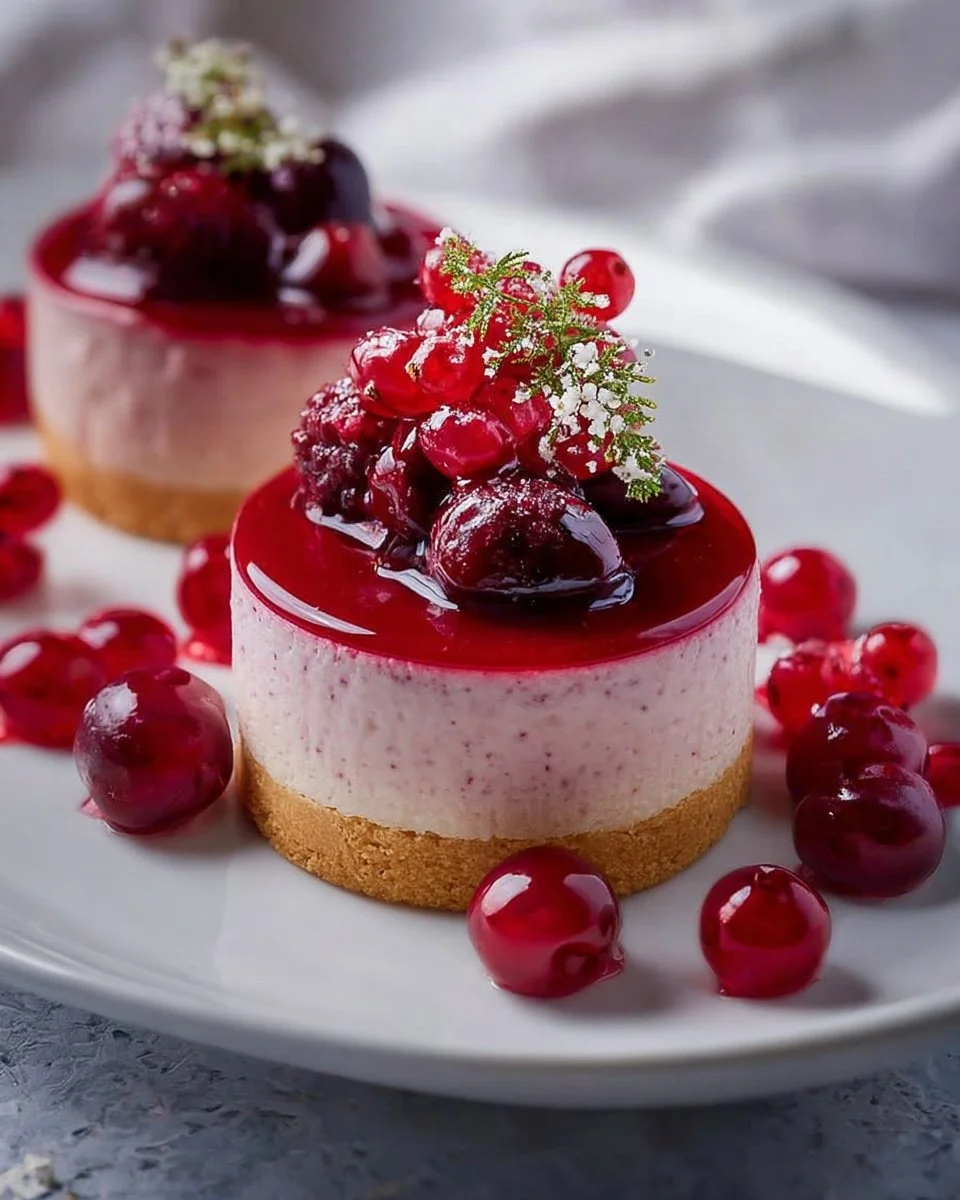
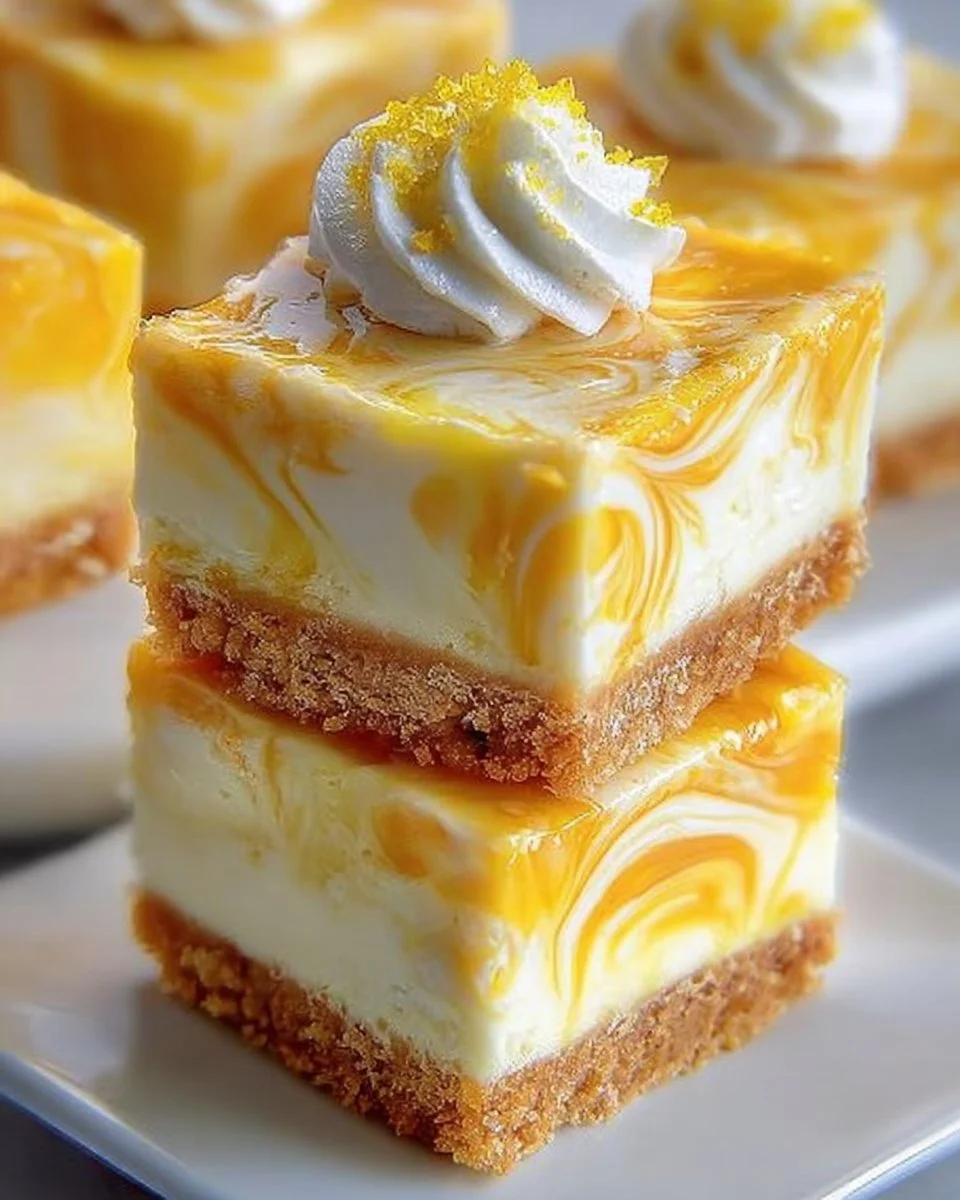
Imagine sinking your fork into a luscious, cream-filled slice of cheesecake, the tang of fresh lemon dancing on your palate as soft whispers of vanilla wrap around the rich creaminess. Lemon Marbled Cheesecake Bars invite you to indulge in a delightful balance of flavors, each bite revealing an elegant swirl of bright citrus and velvety cheesecake. With the first taste, your senses awaken; the buttery graham cracker crust gives a satisfying crunch, while the silky filling melts effortlessly in your mouth. This dessert isn’t just a treat; it’s an experience that lifts your spirits and brightens your day.
As the aroma of baked cheesecake wafts through your kitchen, an inviting warmth envelops you, promising a slice of sunshine even on the cloudiest days. Whether served at a summer picnic or at a cozy evening gathering, these bars embody the spirit of celebration. The radiant yellow marbling adds a visual spectacle, transforming a simple dessert into an eye-catching centerpiece that begs to be shared and savored.
Why You’ll Love This Lemon Marbled Cheesecake Bars
Lemon Marbled Cheesecake Bars stand out in the universe of desserts, capturing the essence of balance between sweet and tart. The creamy texture of the cheesecake harmonizes perfectly with the zesty lemon, creating an indulgent treat that feels light yet satisfying. Whether you’re entertaining guests or treating yourself after a long day, these bars promise to elevate your mood and tastebuds alike.
Benefits of This Recipe:
- Delightfully Flavorful: Each bite bursts with a fresh, citrusy zing that enlivens your palate, making it a perfect refreshment.
- Versatile Occasions: These bars suit a variety of gatherings—from family celebrations to casual barbecues. The lightness makes them an ideal dessert for warm weather, but their creamy richness promises satisfaction year-round.
- Easy to Share: Cut them into squares and serve on platters, encouraging your friends and family to indulge together. Honestly, these bars practically disappear at parties!
Preparation Phase & Tools to Use
Creating these Lemon Marbled Cheesecake Bars requires just a few essential tools that help you whip up this delightful dessert efficiently. Here’s what you’ll need:
- 9×13 inch Baking Dish: This size provides the perfect space for your bars, contributing to even baking and giving you ample room for slicing.
- Medium and Large Mixing Bowls: Use these for combining your crust and filling ingredients without overcrowding.
- Electric Mixer or Whisk: You need a sturdy mixer to achieve that luxuriously smooth cheesecake texture, but a manual whisk works well if you’re feeling adventurous and want a good arm workout!
- Spatula: A trusty spatula ensures you can effortlessly spread your cheesecake mixture and achieve the gorgeous marbling that makes this dessert irresistible.
- Parchment Paper: Lining your baking dish with parchment helps to remove the cheesecake bars easily after baking, preventing any gooey disasters.
Practical Preparation Tips:
- Soften the Cream Cheese: Take your cream cheese out at least an hour before you begin to allow it to soften, which guarantees a smoother filling.
- Gather All Ingredients First: Before you start baking, make sure all your ingredients are at the ready. This step keeps the process flowing without interruptions and measurements while in a flow allows your creativity to shine.
Ingredients for Lemon Marbled Cheesecake Bars
- 2 cups graham cracker crumbs: These form the crunchy base that perfectly contrasts the creamy filling.
- 1/2 cup unsalted butter, melted: This binds the crust, providing richness and depth of flavor.
- 1/4 cup sugar: A touch of sweetness balances the flavors in the crust.
- 4 (8 oz) packages cream cheese, softened: The foundation of the cheesecake, rich and decadent.
- 1 cup sugar: This sweetens the filling, allowing the lemon to shine through without overpowering it.
- 4 large eggs: They provide structure and creaminess to the cheesecake filling.
- 1 teaspoon vanilla extract: Vanilla enhances both the flavor and aroma, adding an irresistible warmth.
- 1/4 cup fresh lemon juice: The star of the show; fresh juice gives a bright, tangy flavor.
- Zest of 1 lemon: It introduces more of that bold citrus flavor, elevating every bite of cheesecake.
Key Ingredients & Possible Substitutions:
- Graham Cracker Crumbs: If you prefer a different base, try crushed Oreo cookies for a chocolatey twist or almond flour for a gluten-free option.
- Cream Cheese: Neufchâtel cheese can substitute for a lower-fat option without sacrificing flavor.
- Lemon Juice and Zest: Bottled lemon juice works in a pinch, but the freshness of real lemons enhances the bars’ overall brightness.
How to Make Lemon Marbled Cheesecake Bars
- Preheat your oven to 325°F (163°C). Grease a 9×13 inch baking dish, ensuring it’s well-coated for easy removal.
- Prepare the crust: In a medium bowl, combine the graham cracker crumbs, melted butter, and 1/4 cup sugar. Mix thoroughly until all crumbs are moistened. Press the mixture firmly into the bottom of the prepared baking dish to form a solid crust.
- Make the filling: In a large mixing bowl, beat together the softened cream cheese and 1 cup sugar until smooth and creamy. Add the eggs one at a time, blending well after each addition. Stir in the vanilla extract, lemon juice, and zest until fully combined. This fragrant mix will have you dreaming of summer!
- Create the first layer: Pour half of the cheesecake mixture over the crust, smoothing it out with a spatula.
- Marble the topping: Add drops of the remaining cheesecake mixture on top of the first layer and then use a knife to create gentle swirling motions. This marbling not only adds visual appeal but ensures every bite carries that zesty infusion.
- Bake your masterpiece in the preheated oven for about 30-35 minutes, or until the center is set and slightly jiggles when shook gently.
- Cool and chill: Once baked, allow the bars to cool completely. Then, refrigerate for at least 2 hours before cutting into squares. The chilling process leads to a firmer texture and allows the flavors to meld perfectly.
Chef’s Notes & Helpful Tips
- Make-ahead tips: You can bake these bars a day in advance, allowing flavors to deepen. Just cut and store in an airtight container in the refrigerator until ready to serve.
- Cooking alternatives: If you’re short on time, consider using an air fryer following similar temperatures and times, which can give an incredible crust while maintaining creaminess.
- Customization ideas: Experiment with different citrus fruits, such as lime or orange, for unique flavor profiles. Add a swirl of raspberry puree for a different color and taste dimension.
Common Mistakes to Avoid
- Skipping the softening process: Ensure the cream cheese is thoroughly softened. If it remains cold, it will lead to a lumpy filling that doesn’t achieve the desired creaminess.
- Not cooling or chilling adequately: Allowing your bars to cool completely before refrigerating is crucial for achieving the perfect texture and flavors. Cutting too soon can result in messier, soggy bars.
- Overbaking: Keep an eye on your cheesecake bars in the oven. They should remain slightly jiggly in the center when you remove them—this ensures they will set properly as they cool.
What to Serve With Lemon Marbled Cheesecake Bars
These delightful Lemon Marbled Cheesecake Bars shine on their own, but they pair beautifully with various accompaniments:
- Fresh Berries: Strawberries, blueberries, or raspberries bring a touch of tartness that complements the creamy sweetness.
- Whipped Cream: A fluffy dollop of whipped cream adds another level of richness, softening the tang of lemon.
- Mint Leaves: Fresh mint offers a refreshing contrast that can elevate the entire dessert experience.
- Coffee or Tea: The slight bitterness of coffee or the soothing notes of tea creates a perfect pairing, enhancing the refreshing flavors of lemon.
- Chocolate Sauce: Drizzling warm chocolate sauce over the bars adds an enticing richness to balance the tartness.
- Lemon Sorbet: A scoop of lemon sorbet on the side enhances the citrus notes and serves as a light, cool complement to the bars.
Storage & Reheating Instructions
To keep your Lemon Marbled Cheesecake Bars fresh and delicious:
- Refrigerate: Store leftovers in an airtight container in the fridge for up to 3 days. The flavors continue to develop, making them even tastier!
- Freeze: For longer storage, wrap each bar individually in plastic wrap, then place in a freezer-safe bag or container. They last up to 2 months in the freezer.
- Reheating: Thaw overnight in the fridge before enjoying. You can eat them chilled or allow them to come to room temperature for a softer bite.
Estimated Nutrition Information
Each Lemon Marbled Cheesecake Bar is approximately 250 calories, with 19g of fat, 10g of carbohydrates, and 4g of protein. This estimate varies based on portion sizes and specific ingredient brands. Remember to enjoy these bars in moderation as part of a balanced diet.
FAQs
Can I make this recipe gluten-free?
Absolutely! Substitute graham cracker crumbs with gluten-free alternatives like crushed almond flour or gluten-free cookies.
Can I use another fruit in this recipe?
Yes! Try swapping lemon juice with lime or orange juice, and adjust zest accordingly to create your own fruit-flavored variations.
How can I make the cheesecake smoother?
Ensure your cream cheese is fully softened before mixing. You can also blend the mixture longer for an extra creamy consistency.
What can I do if my bars crack on top?
Cracks are quite common. To minimize them, avoid overmixing your filling, and bake it at a slightly lower temperature.
Can I serve these bars warm?
While they are best served cold, you can indulge them warm. Just remember that the texture will be softer.
Conclusion
With its harmonious blend of creamy cheesecake and vibrant lemon flavors, this Lemon Marbled Cheesecake Bars recipe will captivate your heart and palate alike. Baking these bars transforms simple ingredients into a delightful masterpiece that is both visually stunning and utterly delectable. So gather your loved ones, put your apron on, and savor the joy of creating something extraordinary. Get ready to relish each mesmerizing bite—it’s time to indulge!
Print
Lemon Marbled Cheesecake Bars
- Prep Time: 15 minutes
- Cook Time: 35 minutes
- Total Time: 50 minutes
- Yield: 16 servings 1x
- Category: Dessert
- Method: Baking
- Cuisine: American
- Diet: Vegetarian
Description
Delicious cheesecake bars with a creamy filling infused with zesty lemon and a crunchy graham cracker crust.
Ingredients
- 2 cups graham cracker crumbs
- 1/2 cup unsalted butter, melted
- 1/4 cup sugar
- 4 (8 oz) packages cream cheese, softened
- 1 cup sugar
- 4 large eggs
- 1 teaspoon vanilla extract
- 1/4 cup fresh lemon juice
- Zest of 1 lemon
Instructions
- Preheat your oven to 325°F (163°C). Grease a 9×13 inch baking dish, ensuring it’s well-coated for easy removal.
- Combine the graham cracker crumbs, melted butter, and 1/4 cup sugar in a medium bowl. Press the mixture firmly into the bottom of the prepared baking dish to form a solid crust.
- Beat together the softened cream cheese and 1 cup sugar until smooth and creamy in a large mixing bowl. Add the eggs one at a time, blending well after each addition. Stir in the vanilla extract, lemon juice, and zest until fully combined.
- Pour half of the cheesecake mixture over the crust, smoothing it out with a spatula.
- Add drops of the remaining cheesecake mixture on top of the first layer and use a knife to create gentle swirling motions.
- Bake for about 30-35 minutes, or until the center is set and slightly jiggles when shaken gently.
- Allow to cool completely, then refrigerate for at least 2 hours before cutting into squares.
Notes
Make-ahead tips: You can bake these bars a day in advance. Store in an airtight container in the refrigerator until ready to serve.
Nutrition
- Serving Size: 1 bar
- Calories: 250
- Sugar: 19g
- Sodium: 200mg
- Fat: 19g
- Saturated Fat: 12g
- Unsaturated Fat: 4g
- Trans Fat: 0g
- Carbohydrates: 10g
- Fiber: 0g
- Protein: 4g
- Cholesterol: 70mg