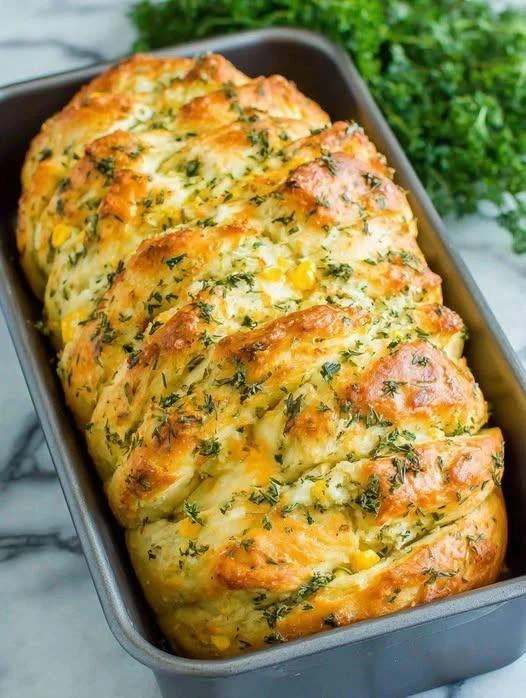
The aroma wafts through your kitchen, rich and inviting. Each breath fills your senses with the warmth of toasted garlic intertwined with the earthiness of fresh rosemary. The anticipation builds as you await the moment you can pull that golden, crusty loaf from the oven. This isn’t just any bread; this is Rustic No-Knead Rosemary Garlic Bread, a simple yet utterly transformative recipe that elevates an everyday meal into something extraordinary. With its perfectly crunchy exterior and soft, airy interior, each slice beckons to be slathered with butter, dipped in olive oil, or used to soak up a delicious broth.
Imagine breaking into that crust, the satisfying crackle delighting your ears, as the steam escapes carrying the herbal scent straight to your heart. Your fingers sink into the tender dough, and the taste – an explosion of garlicky warmth elevated by bright bursts of rosemary – dances on your palate, whispering of rustic Italian kitchens and sun-drenched Mediterranean breezes. With just a bit of planning, you too can whip up this divine bread that seems to boast of days gone by with every bite.
Why You’ll Love This Rustic No-Knead Rosemary Garlic Bread
You might wonder what sets this bread apart from every other loaf. First and foremost, it demands minimal effort while delivering maximum flavor. This no-knead recipe invites you into the enchanting world of bread-making without requiring hours of your time or intense technical skills. Simply mix, let it rest, and bake. The long fermentation gives depth to the taste, creating a texture that strikes the perfect balance between chewy and fluffy.
This simple yet satisfying bread shines at any occasion. Serve it fresh from the oven at a cozy dinner with friends, pair it with your favorite soup on a chilly night, or toast it lightly and enjoy it as an indulgent breakfast treat smeared with creamy ricotta and honey. Its versatility makes it a staple in your kitchen, ensuring that no matter the season, you have a touch of warmth ready to enhance your meals.
Preparation Phase & Tools to Use
Creating this scrumptious bread doesn’t require a plethora of complicated gadgets, but a few essential tools will help you achieve the perfect loaf. Think of them as your bread-making allies.
-
Large Mixing Bowl: This is where the magic begins. A sturdy bowl allows for easy mixing and rising without the mess.
-
Wooden Spoon or Dough Scraper: A trusty wooden spoon blends ingredients seamlessly, but a dough scraper assists in shaping without sticking.
-
Plastic Wrap or a Kitchen Towel: Covering your dough during the rising phase keeps it cozy and prevents it from drying out.
-
Dutch Oven: This is the vessel that transforms ordinary bread into crusty perfection by creating an oven-like atmosphere filled with steam.
Preparation Tip: Have all ingredients at room temperature, especially the water, to encourage the yeast to work its magic.
Ingredients for Rustic No-Knead Rosemary Garlic Bread
A simple list of ingredients makes this recipe approachable:
-
3 cups all-purpose flour: This forms the backbone of your bread, providing the structure and chewiness. Whole wheat flour can be a wonderful substitute for a heartier flavor.
-
1 1/2 tsp salt: Essential for flavor and regulating yeast activity, ensuring the bread rises beautifully.
-
1/2 tsp instant or active dry yeast: This tiny powerhouse brings your dough to life.
-
1 1/2 cups warm water: It hydrates the flour, creating a sticky dough that bakes beautifully.
-
2 tbsp fresh rosemary, chopped: Infuses the bread with fragrant, herbal notes that awaken your senses.
-
2-3 garlic cloves, minced: This adds a delightful punch, enhancing the overall flavor with its sweet, roasted notes.
Preparation Tip: If fresh rosemary isn’t at hand, dried rosemary works too, although the flavor may not be as vibrant.
How to Make Rustic No-Knead Rosemary Garlic Bread
Now, let’s dive into the baking process. Follow these steps for bread that impresses every time:
-
In your large mixing bowl, combine 3 cups of all-purpose flour, 1 1/2 tsp of salt, and 1/2 tsp of yeast. Mix well to ensure even distribution.
-
Gradually add 1 1/2 cups of warm water. Use a wooden spoon to stir until the mixture forms a sticky dough. It’s okay if it seems a bit messy; this is part of its charm!
-
Gently fold in the chopped rosemary and minced garlic, creating an aromatic blend that envelops the dough in flavor.
-
Cover the bowl tightly with plastic wrap or a kitchen towel. Let the dough rise at room temperature for 12-18 hours. Patience is key during this phase; the longer, the better.
-
Once the dough has risen, flour a clean surface and turn the dough out, shaping it gently into a ball.
-
Preheat your oven to 450°F (232°C). Place your Dutch oven (with the lid) inside to heat for about 30 minutes.
-
Carefully remove the hot Dutch oven and place the dough inside, covering it again. Bake for 30 minutes with the lid on.
-
Remove the lid and bake for an additional 15 minutes until the loaf turns a stunning golden brown.
-
Allow the bread to cool slightly before slicing into it, letting the aroma swirl around your kitchen.
Helpful Tip: For a deeper crust, you can mist your dough with water just before placing it in the oven.
Chef’s Notes & Helpful Tips
-
Make-ahead Tips: Mix your dough the night before and let it rise overnight. Fresh bread for breakfast? Yes, please!
-
Cooking Alternatives: If you lack a Dutch oven, use a cast-iron skillet covered with aluminum foil.
-
Customization Ideas: Feel free to toss in your favorite herbs, such as thyme or oregano, or add cheese for a savory twist.
Common Mistakes to Avoid
Even simple recipes can have their pitfalls. Watch out for the following:
-
Rushing the Rising Time: Do not try to speed up the fermentation. Give the yeast plenty of time to do its job; otherwise, your bread may turn out dense.
-
Overflouring the Surface: While a little flour helps with shaping, too much prevents that lovely crust from forming.
-
Underbaking: Rely on visual cues. A deep golden color indicates a crust that has developed fully.
What to Serve With Rustic No-Knead Rosemary Garlic Bread
This bread is more than just a loaf; it’s an invitation to create delightful pairings. Here are some suggestions:
-
Herb-infused Olive Oil: Perfect for dipping, the flavors melt together beautifully.
-
Hearty Soups: Pair with split pea or a classic minestrone for a comforting meal.
-
Cheese Board: Serve alongside rich cheeses like brie and sharp cheddar for a sophisticated appetizer.
-
Breakfast Toast: Top with avocado, poached eggs, and a sprinkle of chili flakes for a nutritious start to your day.
-
Salads: Enjoy alongside a robust Caesar salad, where the bread offers a perfect contrast to crisp greens.
-
Stews: Perfect for mopping up flavorful broths; the bread is a vehicle for flavor.
-
Dips: Marinate with creamy hummus or bean dip to create an appetizer spread.
Storage & Reheating Instructions
To keep your bread fresh, allow it to cool completely before storing. Keep it in an airtight container at room temperature for up to 2 days. If you need it to last longer, wrap it tightly in plastic, then aluminum foil, and freeze for up to three months.
To reheat, simply place the thawed bread in a 350°F (175°C) oven for about 10 minutes to restore its crust. Baking brings back that freshly made crunch.
Estimated Nutrition Information
Each slice of this beautiful Rustic No-Knead Rosemary Garlic Bread offers an estimated:
- Calories: 150
- Total Fat: 0.5g
- Sodium: 150mg
- Carbohydrates: 32g
- Fiber: 1.5g
- Protein: 4g
Values may vary based on specific ingredients and portion sizes.
FAQs
Can I use bread flour instead of all-purpose flour?
Absolutely! Bread flour can add even more chewiness to the bread due to its higher protein content. Adjust the water slightly if needed.
What if the dough seems too wet?
If your dough feels overly sticky, sprinkle in just a touch more flour but remember that a wet dough produces airier bread!
Can I add other ingredients?
Yes! Consider sun-dried tomatoes, nuts, or different herbs to mix up the flavor profile.
What’s the best way to slice the bread?
For the cleanest slices, use a serrated knife while the bread is still slightly warm.
Is this recipe suitable for beginners?
Definitely! The simplicity of this no-knead method is perfect for novice bakers. Just follow the steps, and you’ll impress everyone!
Conclusion
Baking Rustic No-Knead Rosemary Garlic Bread nurtures not just your body but your spirit as well. Each loaf crafted fills your home with warmth, and each bite transports you to a place of comfort and joy. In just a few simple hours, you create a masterpiece that showcases your love for food and family. So why wait? Grab your ingredients, gather your tools, and let the bread-making adventure begin. Your kitchen deserves this delightful aroma, and your taste buds will thank you!
Print
Rustic No-Knead Rosemary Garlic Bread
- Prep Time: 15 minutes
- Cook Time: 45 minutes
- Total Time: 18 hours
- Yield: 8 servings 1x
- Category: Bread
- Method: Baking
- Cuisine: Italian
- Diet: Vegetarian
Description
A simple yet transformative no-knead bread enriched with the flavors of rosemary and garlic, perfect for any meal.
Ingredients
- 3 cups all-purpose flour
- 1 1/2 tsp salt
- 1/2 tsp instant or active dry yeast
- 1 1/2 cups warm water
- 2 tbsp fresh rosemary, chopped
- 2–3 garlic cloves, minced
Instructions
- Combine the flour, salt, and yeast in a large mixing bowl.
- Add the warm water gradually and stir with a wooden spoon until a sticky dough forms.
- Fold in the chopped rosemary and minced garlic until well incorporated.
- Cover the bowl with plastic wrap or a kitchen towel and let it rise at room temperature for 12-18 hours.
- Flour a clean surface and turn the dough out, shaping it gently into a ball.
- Preheat your oven to 450°F (232°C) and place a Dutch oven inside to heat for about 30 minutes.
- Carefully remove the hot Dutch oven, place the dough inside, cover it again, and bake for 30 minutes with the lid on.
- Remove the lid and bake for an additional 15 minutes until golden brown.
- Allow the bread to cool slightly before slicing.
Notes
For a deeper crust, mist the dough with water before baking. Store bread in an airtight container for up to 2 days or freeze for up to three months.
Nutrition
- Serving Size: 1 slice
- Calories: 150
- Sugar: 0g
- Sodium: 150mg
- Fat: 0.5g
- Saturated Fat: 0g
- Unsaturated Fat: 0g
- Trans Fat: 0g
- Carbohydrates: 32g
- Fiber: 1.5g
- Protein: 4g
- Cholesterol: 0mg